
Nature Activities for Elementary-Aged and Younger:
Trees as Habitats
Objective: Learn about the interactions between trees and the species that inhabit them
Location: Outside
Age Groups: Elementary
Supplies: paper, writing utensils Optional: magnifying glass
Instructions:
1. Assign each student or group of students to a single tree.
2. Have students look for evidence of animals. This may include holes, nests, scat, scratches, nut shells, etc., and then draw as many animals as they believe they found.
3. Have the students draw a large tree, and illustrate the animals they discovered and their relationship to the tree. Discuss with students the relationships and whether or not they think the interactions are helpful or harmful to the tree.
4. Repeat with as many trees as desired.
Optional Variation:
Species Counting: have students bring a magnifying glass and count insects or small creatures that live in the tree. Have students make a data sheet with a drawing of each species and a tally mark of the number of individuals they counted.
a. Recheck- you may wish to have students do this activity every few months, to note how seasonal changes affect populations.
b. Data Recording: to turn this into a larger, more scientific project, you can also record time of day, temperature, weather conditions, etc, and discuss with the students how these factors affect the animals.
Discussion Points
- Did animal populations vary from tree to tree? Why or why not? If so, what variations did you notice?
- Why are the animals using the tree? Which species do you believe are helping the tree and which do you believe are harming it? What can we do to encourage the helpful and discourage the harmful?
- Did some animals prefer particular trees over others? Why do you think that is?
Nature as Art
Objective: Find simple beauty in nature.
Location: Outside (anywhere, preferably in the woods)
Age Groups: Elementary
Supplies: None
Instructions: Assign each student or group of students a 3'x3' (or so) plat of land. This is their canvas. Have students collect natural materials to create a piece of art. You can direct the projects with prompts such as “the picture has to tell a story,” or “create a landscape,” or “illustrate something you've learned."
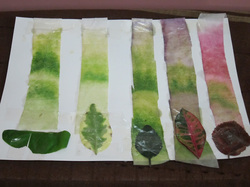
Leaf Pounding

Objective: Create a piece of art using leaves.
Location: Outside near trees and somewhere with a hard surface such as a sidewalk or blacktop.
*Note: this works better in areas with more deciduous trees rather than evergreen.
Age Groups: Elementary/Middle
Supplies: muslin (a very thin type of cloth, available at most craft stores),
mallets (rubber or wood), Optional: scissors, paint, sticks, glue, string
Instructions: First, lead the students on a short outdoor “tree tour,” where you identify local tree species and how to identify them by their leaves. At each tree, if possible, give each child a leaf to use in their pounding. Upon returning to the location where they will be crafting, give each child a 1.5'x1' rectangle of muslin and a mallet. Instruct them to place the leaves under the muslin and pound until the chlorophyll bleeds through, showing the shape of the leaf. This can also be done with leaves as they change into their fall colors, but note that carotenoids (the pigments responsible for the oranges, yellows, and reds) do not generally stain the muslin as well as chlorophyll.
*Note: the chlorophyll will also stain the floor, so doing this activity on a sidewalk/blacktop/outdoor pavilion may be best.
Optional Variations:
Older students can cut the leaves into shapes before pounding.
You can give students markers or paint to decorate/label their poundings.
Students may collect short straight sticks to use in hanging their art. After pounding, place the stick across the top of the art and fold the muslin over top. Glue the muslin to itself to form a loop around the stick. Tie a length of string to either end of the stick to create a hanging piece of art.
Nature Etiquette Coloring Book
Objective: Create an interactive coloring book that exemplifies proper behavior for interacting with nature.
Location: Classroom
Age Groups: Primary, Elementary
Supplies: paper, pencils, black markers
Instructions: Hold a class discussion about how we as humans can impact the environment and how we can help to minimize that with simple actions. Examples include: Recycling, not touching wildlife, putting out fires, staying on trails, turning off water while you brush your teeth, etc. Give students each a piece of paper, a pencil, and a marker, and instruct them to draw a coloring book page depicting one of the ways to help the environment. The pages can be collected, copied, and put together as a book that is distributed to the students and/or shared with other classes.
Getting in Touch with Nature
Objective: Students will go on a small scavenger hunt to find small items they only perceive by touch.
Location: Outside
Supplies: Shoebox with a fist-sized hole cut into the smaller side.
Source: https://www.forestfoundation.org
Instructions:
Find an open space in the forest where children can walk around freely. Collect several objects from the forest floor around the area (pine cones, leaves, pine needles, berries, gumballs, etc), and place them in the shoe box. Have the students each feel one or more items in the box and search around the clearing for the object(s).
Soil Composition
Objective: Learn what composes soil
Location: Classroom, then outside in a schoolyard or field
Age Groups: Elementary, Middle
Supplies: Small shovels or trowels, Optional: Rulers/Tape Measures and string
Instructions:
Have each student write a paragraph describing soil [left intentionally vague]. Then take them outside and each student or pair of students excavate a square-foot plot using the trowels (Optional: Use string and tape measures to mark the plots). Students will then sift through the soil, taking notes on things such as the soil texture (dry, moist, rocky, etc), color, organisms (insects, roots, fungal hyphae), and any other aspects they wish. Afterwards, have them rewrite their description of soil. Variation: Disperse the students so that they are sampling soil from different environments. Examples include: forest floor, creek adjacent, primarily shady, primarily sunny, rock-adjacent, on a slope, etc. Discuss the differences in the soil and why these differences are present.
**For a more in-depth soil study, check out our Soil Characterization protocol.
Natural Sundial
Objective: Use a natural landmark and basic geometry to track changes in the sun’s movements over the seasons.
Location: Outside
Age Groups: Elementary/Middle
Supplies: Protractor, measuring tape
Next Generation Science Standards: 5-ESS1-2
Instructions:
1. Find a natural landmark, such as a tree, that is in an open space where its shadow does not interact with any others.
Note: try to pick an older tree that will not grow much over the course of the year. If trees are unavailable, other landmarks such as statues or fence posts are suitable.
2. Have the students measure the shadow of the tree, noting the length and the angle to an arbitrary axis (perhaps a sidewalk, spray-painted [or otherwise marked] line, etc).
3. Repeat this exercise at the same time of day at different points in the year, again measuring the shadow length and angle.
4. Make a chart of the changes, then discuss or have the students write up how the changes in the earth’s relative position to the sun cause
these changes. This can also be used to provide an introduction to graph-making.
Energy Tracker
Objective: Learn where all the energy that living things need come from.
Location: Classroom
Age Groups: Elementary
Source: My Brain
Next Generation Science Standards: 5-PS3-1
Instructions: Divide the class into groups of four or so. The students will determine where their energy comes from by means of discussion. Ie, you get your energy from food, but where does the food get it from? If you eat a cow, it gets is energy from plants, and plants get their energy from the sun. Have each group make a diagram or flow chart to show their findings.
Adaptations
Objective: To understand how different living things adapt to their environment
Location: Classroom/Outside
Age Groups: Elementary, Middle
Supplies: None
Instructions: This can be accomplished in many ways, depending on the age group. You can simply discuss with the class, or in groups or pairs, the way we as humans adapt to our environments, both biologically and behaviorally: Example: We tan in the summer, we wear warmer clothes when we get cold, we shiver to warm ourselves up. Then have each group pick an animal or plant and research how it is adapted to its environment.
Alternative: Pick similar species from different climates, and note the changes in their morphology that allow them to live there. Example: Arctic hare vs jackrabbit: arctic hares have smaller ears to reduce heat loss, as well as thicker coats that are white to blend in with the snow. Jackrabbits have larger ears to release heat, and lighter coats.
Environmental Impacts
Objective: Learn through discussion and examples that it is not only genetics, but environment that can affect traits.
Location: Classroom or perhaps on a nature hike.
Ages: Elementary
Supplies: None
Instructions: Have students come up with examples on how the environment can shape an organism. Plants are an excellent example, so this can be accomplished on a nature hike, where you can find two of the same types of tree, one in an open area with lots of sunlight (more spread out) and another in a forest (leaves tend to be concentrated towards the top). Other options include windswept hills (generally stunted), or with a nearby water supply (roots that extend toward water). You may wish to have students create a Venn Diagram about two organisms of the same species.
Predator-Prey Simulation
Objective: Learn that the relationships between population numbers of predators and their prey.
Location: Classroom
Ages: Elementary, Middle
Source: http://www.nclark.net/Ecology
Materials: 100 pre-cut small squares for each group (approximately 1 in square)—these will represent the prey – and 50 larger squares (approximately the size of ½ an index card)—these will represent the predators. **Note: if constructing the cards is too time consuming for the teacher, other supplies can be used. Suggestions include pennies, counting chips for math class, etc.
We have provided a classroom worksheet here for your convenience.
Instructions:
1. To begin, place 3 prey cards on the table, in a random pattern. Then, toss a predator card onto the table. The predator must be touching at least 3 prey to survive, and all prey that are touched are removed. Initially, the predator will not survive.
2. At the end of each round, the numbers of remaining predators and prey are doubled. If there are no predators, one will be “introduced” to the system. It may be quite a while before the prey population can sustain a predator.
3. Record the number of predators and prey that start each round and end each round on the table provided (or have the students create their own).
4. Repeat the process for 20 generations.
Discussion Questions (can be discussed as a class or completed as individual/group work. These are provided on the accompanying worksheet)
1. How large did the prey population have to be to sustain a predator? What happened to the prey population as the number of predators increased? How long were the predators able to maintain their population?
2. How does this simulation model a real ecosystem? Are there other, unaccounted-for factors that can influence population dynamics?
3. Graph the populations of predators and prey on the same graph. What relationships do you notice between the two lines?
Optional: You may choose to put the activity into context by leading or following with a lecture/discussion on the classic lynx/hare population study. Information may be found here: http://www.britannica.com/blogs/2011/06/rise-fall-canada-lynx-snowshoe-hare/
Raingauge (or Snowgauge)
Objective: Collect data about the rainfall or snowfall in your area.
Location: Outside, at an open, unobstructed site that can be checked regularly.
Age Groups: Elementary/Middle
Supplies: Two-liter soda bottles, permanent marker, ruler, scissors
Instructions:
1. First, make the snow gauges. Each student can make his own, or you could make a few for the entire class.
Cut off the top of the two-liter soda bottle so that you are left with a straight cylinder.
2. Use the ruler to mark the measurements (every quarter-inch or centimeter) from the bottom of the bottle, or, if you prefer, from where the bottle assumes a consistent shape (ie not including the little feet at the bottom. You may also wish to fill the bottom of the bottle with rocks or plaster so that it gains more stability and also removes the added complications of the little feet). Place the gauge outside over a period of time that you know it will snow (or rain), and afterwards record the data on a spreadsheet.
Variations:
1. Have each student put their gauge outside their own house (out in the open, preferably), and record how much snow or rain they get during a storm or period of time, say overnight or during a specific 12, 24, or 48 hours. After all data is recorded, have the students mark where they live and the precipitation total on a map and compare the differences on precipitation based on location. Possible hypotheses for variation include: differences in elevation, tree cover, terrain, etc.
2. Record the precipitation for your area over an extended period of time. Each student can do this individually at their home, or you can have a “class” gauge placed outside the school, with a rotating list of students to check it each morning. Record each day’s precipitation on a board or spreadsheet. Then, you can use the data for practicing graphs, calculating means and medians, etc. If you continue to do this over multiple years, have students compare their data to previous years or make predictions.
Measuring Snowdrifts
Objective: Learn about the formation of snow drifts
Location: Outside
Age: Elementary
Supplies: Yard sticks or Rulers (optional: compass)
Instructions: After a moderate or heavy snow, have the students measure the depth of the snow in two locations: in a snowdrift and in the surrounding area (this can be done at school or at home). You may wish to have the students use a compass to determine the orientation of the drift (ie if the drift was up against an east-facing wall, the drift would be oriented from east to west, from the shallow point to the deep point). Using this data from multiple drifts, you can have the students calculate or plot on graphs statistics like mean drift height, mean surrounding snow height, mean difference between drift and surrounding snow, etc. You can also use the orientation data to guess what way the wind was blowing during a storm.
Growing Seeds
Objective: learn what kind of environments are ideal for seed growth.
Location: Classroom/indoors
Age: Elementary
Supplies: Rulers, plant seeds (Nasturtiums, Marigolds, or mustard seed is recommended), planters (single-serving milk cartons from school cafeterias are a very viable substitute), potting soil. The rest of the materials depend on what type of experiments your students would like to perform.
Heat Variation: Heat lamps and thermometers
Color Variation: Green, red, blue, and clear plastic wrap
Instructions: This can be a group or individual project. The idea is for students to think critically about what affects plant growth and to design an experiment based on their chosen variables. Each group will monitor their plants over a number of days or weeks, taking daily measurements of the plant growth and recording them on a chart. While the students are designing their experiments, make sure to emphasize the importance of control tests.
Possible Variables:
Heat: place a heat lamp (a ceramic one that does not increase light) on one plant, and leave the other in the open.
Record the temperatures surrounding the plants as well as daily growth.
Color: Use one of a variety of different colored lights (lamps covered with plastic wrap) as the sole source of light for a plant.
An experiment could contain many different colors or simply a color versus two controls (ie a green-lighted plant, a clear-lighted
plant, and a plant with a lamp with no plastic wrap). Record plant growth daily.
Water: Simply provide plants with varying amounts of water daily (perhaps 0 mL, 10 mL, 50 mL, 100 mL, etc), while keeping all other
variables (light, temperature, etc) the same. Record plant growth daily.
**Encourage free thinking from your students as to how they wish to design their experiment.**
The Green Grass Grows
Objective: Measure grass growth over time
Age Groups: Elementary or Younger
Supplies: Rulers, surveyor’s tape, tent stakes or other markers
Instructions: Consult with your school groundskeeper as to whether or not it is possible to leave a small patch of grass unmowed for your experiment. A 6’x6’ patch is plenty large enough. Mark the experiment area with the surveyor’s tape and stakes so that the area remains undisturbed.
After the grass is freshly mowed, have students measure the grass, record the height, and note any irregularities in the patch (weeds, dandelions, clover, etc). Every week, repeat the experiment, having students measure the height of the grass (you may want to have them measure multiple blades to illustrate the concept of averages), and again note the composition of the patch. Continue plotting the average growth on a class board or in individual notebooks. If there is an unusual amount of growth a particular week, discuss why this may have been: an abundance or lack of rain or sunlight may have contributed.
Classification
Objective: Learn about the classification systems for organisms
Age Groups: Elementary
Instructions: Spend a few minutes teaching the class about the nature of the classification of species (history, kingdoms….species, etc). Divide the students into groups of up to four. Have each group create a fake species of animal, and then draw and name it. They will then research what Kingdom, Phylum, etc...all the way down to Family, that their animal would most likely be classified in. Make sure that they provide reasoning as to why the animal would fit into each category (for example: they produced a salamander-like creature with four toes, so it could be in the family Plethodontidae). They then get to choose the genus and species of their animal.
Beak and Talon
Objective: Understand that structure relates to function, especially in the talons and beaks of birds. Also understand that an animal is the evolutionary product of its environment and thus is modified to best fit into a niche.
Location: Classroom/Homework assignment
Age: Elementary/Early Middle
Supplies: None
Instructions: Assign each student a bird that can be found in your local area (or alternatively, any bird in the world). [Lists of birds commonly found in Northern Arizona can be found at: http://www.northernarizonaaudubon.org/birding/bird-checklists/] Have the student research at home the morphology of the bird’s beak and talons, and write a small report on how those structures allow the bird to exist in its environment. For example, woodpeckers have zygodactylous feet that allow it to cling to tree bark, and a long, probing beak that is used to search tree trunks for insects. Another example is that ospreys have hooked talons to assist in catching fish, and a sharp beak for carving the meat. The student can then present his findings to the class in a short presentation
Optional Variation: After the students have completed their findings, present to the class an ecosystem or natural scenario and allow them to describe what kind of bird would flourish there. For example: depict a wetland environment where fish are abundant. A suitable bird could be a wader, such as a heron or egret, with long spindly legs to stay above water and a beak built for spearing, or perhaps a duck, with short legs and webbed feet for swimming.
Leaf Chromatography
Objective: Learn about the pigments that contribute to plant photosynthesis and separate them via chromatography.
Location: Classroom (outside to gather the leaves)
Ages: Elementary, Middle, High
Supplies: Leaves, coffee filters, rubbing alcohol, small bowls or jars, shallow pans or tubs, hot water
Instructions: Shred the leaves (around 2-3 large leaves or 5-6 smaller leaves), and place them at the bottom of the bowl or jar. Pour just enough alcohol into the jar to cover the leaves, and place the bowl in a shallow tub or pan full of hot water. Leave the jars for about half an hour, replacing the water when it cools and swirling the bowl occasionally. The alcohol will extract the pigments, so you will know the process is complete when the alcohol darkens to the color of the leaves. After this has occurred, place a strip (perhaps 3” wide) of the coffee filter into the jar so that one end is submerged in the liquid and the other is draped over the top. After the desired separation is achieved (this can take anywhere from 30-90 mins), remove the paper and allow it to dry. The larger pigments will have moved the shortest distance, and the smaller pigments will have moved the farthest.
Discussion Questions:
If a plant leaf appears to be one color, why does it have such a range of pigments?
Did you see any colors you were not expecting, such as red or orange? What do you think those pigments are for?
What function do the pigments perform for the plant?
If we were to repeat the experiment in the fall, what differences would we expect to see? Why?
